Chapter 9. Compute Engine: virtual machines
This chapter covers
What are virtual machines (VMs)?
Using persistent storage with virtual machines
How auto-scaling works
Spreading traffic across multiple machines with a load balancer
Compute Engine’s pricing structure
Virtual machines are chopped-up pieces of a single physical system that are shared between several people.
Decouple the virtual machine from the physical machine, so physical machines can be taken offline for maintenance while the virtual machine is live-migrated elsewhere, all without any downtime or significant changes in performance.
Automatic scaling, where the hosting provider can automatically provision more or fewer virtual machines based on incoming traffic or CPU usage,
Performance characteristics (particularly those that might seem counterintuitive), and walk you through the more advanced features (like automatic scaling).
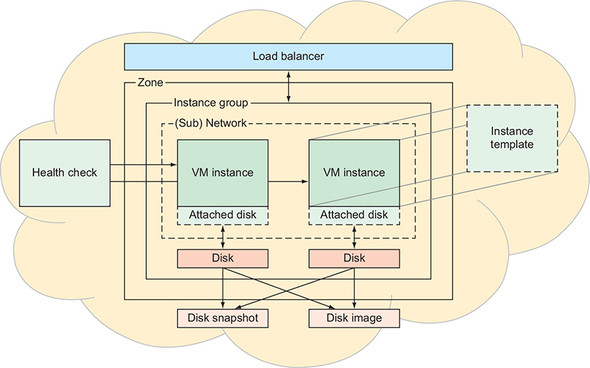
Google Compute Engine (GCE) is an enormous system with almost 40 API resources.
Most common and useful things you can do with GCE.
Figure 9.1. A complete overview of GCE
All you need is a simple VM that you can SSH into and run a server or two.
Customize your virtual machines or balance server requests across a set of many machines.
Starting with a simplified version of the scary diagram that’s much easier to digest.
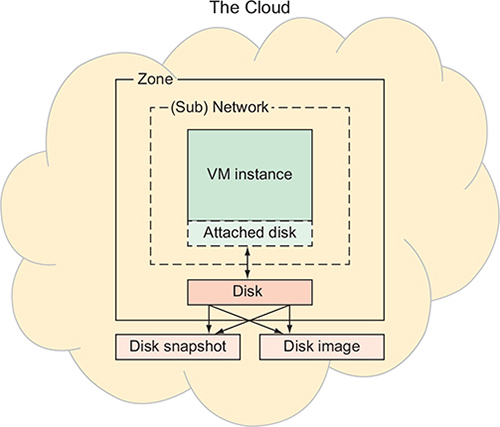
Disk storage makes up the base of your instance.
9.2. Block storage with Persistent Disks
A persistent disk in varying sizes (for example, 100 GB or 1 TB)
Storage service that looked and acted like a regular disk but was replicated and highly available.
9.2.1. Disks as resources
Create and manage disks separately from VMs.
At any time, a persistent disk can be in one of three states:
Unattached—You’ve created the disk, but it’s not mounted on any VMs.
Attached in read-only mode—The VM can only read from the disk.
Attached in read-write mode—The VM can both read and write to the disk.
Attached–read-write state because that’s been the default when creating a VM.
Default value when creating a disk in GCE is the unattached state.

Attach disks to a VM in two different modes (read-only and read-write)
9.2.2. Attaching and detaching disks
Create a disk and take it through the different states.
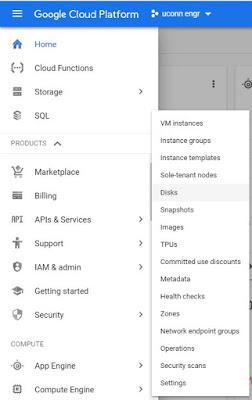
Compute Engine section and choose Disks in the left-side navigation.
Hit Create Disk
to be attached to an instance, a disk must live in the same zone as that instance.
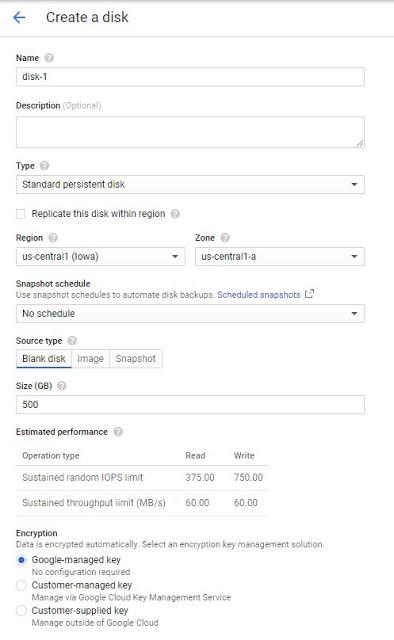
Choose a disk type,
Standard disks acting a lot like traditional hard drives and SSD disks acting like solid-state drives.
SSDs have much faster random operations, and traditional drives are adequate for large sequential operations.
Cost vs. Performance
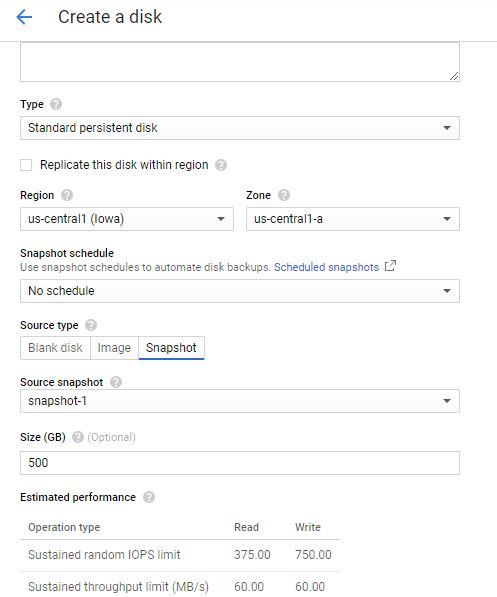
Create an empty disk resource, and choose any size you want for the disk; for example, 500 GB.
Input/output operations per second (IOPS, pronounced eye-ops) is an input/output performance measurement used to characterize computer storage devices like hard disk drives (HDD), solid state drives (SSD), and storage area networks (SAN). Like benchmarks, IOPS numbers published by storage device manufacturers do not directly relate to real-world application performance
Disk size and performance are directly related, such that larger disks can handle more input/output operations per second (IOPS).
Applications that don’t store a lot of data but have heavy access patterns (lots of reads and writes) will provision a larger disk, not for the storage capacity but for the performance characteristics.
You enter a size (in GB), you can see the estimated performance below the field.
When you create an instance, GCE also has to create a disk,

Disk is in the unattached state.
'Cloud Console and look at instance-1. If you scroll down the page a bit, you’ll see a section called Additional Disks,

Edit the VM instance
Attach existing disk
choose your new disk (disk-1) from the list, but be certain you choose to attach it in Read Only mode!
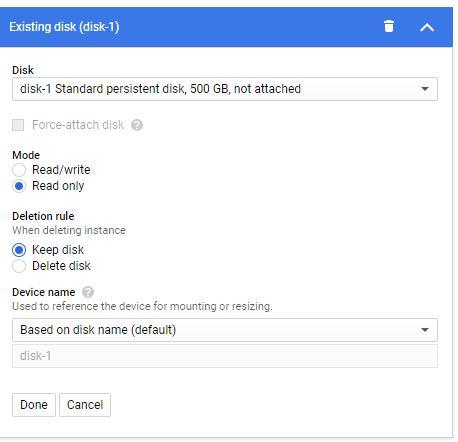
Disk is in the attached–read-only state, which means that it can continue to be attached to other VMs,
Attach that same disk to instance-2, again in read-only mode. This time, you can do so using the attach-disk subcommand.
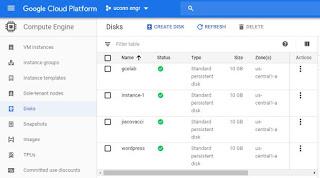
Cloud Console and look at your list of disks, you’ll see that disk-1 is in use by both instance-1 and instance-2.
9.2.3. Using your disks
Plugging your external hard drive into the VM.
Mount the disk device and then format it.
Mount command as well as by calling the mkfs.ext4 shortcut to format the disk with the ext4 file system.
Get your disk into read-write mode, which you can do by detaching the disk from both instances and then reattaching the disk to instance-1 in read-write mode:
Arrow over pencil and use can to remove disk
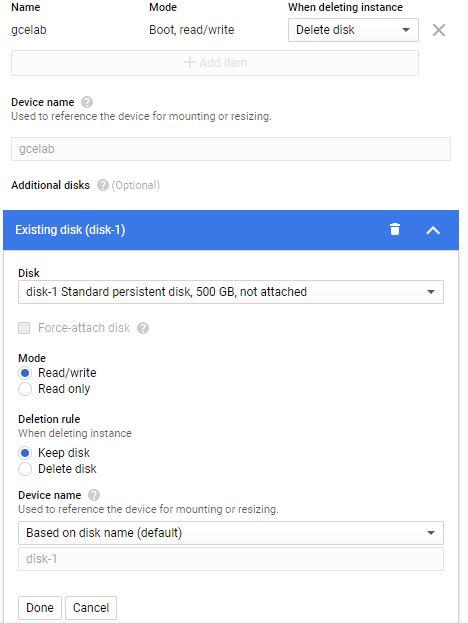
Re-attach as read/write
Once you have disk-1 attached to instance-1 only, and in read-write mode, SSH into instance-1 and look at the disks
john_iacovacci1@gcelab:~$ ls -l /dev/disk/by-id
total 0
lrwxrwxrwx 1 root root 9 Sep 22 21:26 google-gcelab -> ../../sda
lrwxrwxrwx 1 root root 10 Sep 22 21:26 google-gcelab-part1 -> ../../sda1
lrwxrwxrwx 1 root root 9 Sep 22 21:26 scsi-0Google_PersistentDisk_gcelab -> ../../sda
lrwxrwxrwx 1 root root 10 Sep 22 21:26 scsi-0Google_PersistentDisk_gcelab-part1 -> ../../sda1
john_iacovacci1@gcelab:~$
Formatting the disk using its device ID (/dev/disk/by-id/google-disk-1)
9.2.4. Resizing disks
Resize a disk for a variety of reasons
Running out of space
Size of the disk directly correlates to its speed: the bigger the disk, the faster it is
Increase the size of the virtual disk in the Cloud Console
Edit on the disk and then typing in the new size
You can always make a disk larger by increasing the size, but you can’t make a disk smaller.

Resize your file system
resize2fs command on an unmounted disk:
jjg@instance-1:~$ sudoumount /mnt/disks/disk-1/
jjg@instance-1:~$ sudo e2fsck -f /dev/disk/by-id/google-disk-1
e2fsck 1.42.12 (29-Aug-2014)
Pass 1: Checking inodes, blocks, and sizes
Pass 2: Checking directory structure
Pass 3: Checking directory connectivity
Pass 4: Checking reference counts
Pass 5: Checking group summary information
/dev/disk/by-id/google-disk-1: 13/36044800 files (0.0%
non-contiguous), 2312826/144179200 blocks
jjg@instance-1:~$ sudo resize2fs /dev/disk/by-id/google-disk-1
resize2fs 1.42.12 (29-Aug-2014)
Resizing the filesystem on /dev/disk/by-id/google-disk-1 to
157286400 (4k) blocks.
The filesystem on /dev/disk/by-id/google-disk-1 is now 157286400
(4k) blocks long.
remount the disk,
jjg@instance-1:~$ sudo mount -o discard,defaults
/dev/disk/by-id/google-disk-1 /mnt/disks/disk-1
jjg@instance-1:~$ df -h | grep disk-1
/dev/sdb 591G 70M 561G 1% /mnt/disks/disk-1
9.2.5. Snapshots
Freeze your computer at a point in time and be able to jump right to that checkpoint?
Act as those checkpoints for the data on your disk,
Allowing you to jump around in time by restoring a snapshot to a disk
End up costing you much less than a full backup.
Snapshots use differential storage
storing only what’s changed from one snapshot to the next.
create a snapshot, change one block of data
second snapshot will only store the difference
create and delete them at any time
once you have a snapshot of a disk, you can create a new disk based on the content from the snapshot.
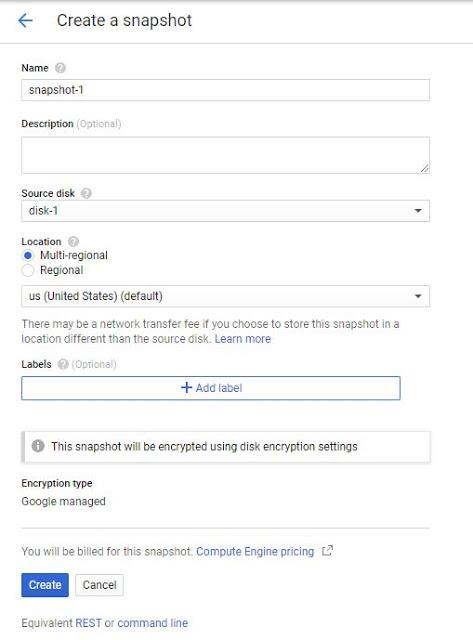
1. Start with disk-1 attached to your instance.
2. Create a snapshot (snapshot-1) from disk-1.
3. Change some data on the mounted copy of disk-1.
4. Create a new instance based on your snapshot and mount it to your instance.

wo versions of disk-1 attached to the VM
One of the disks will be the old version reflecting the snapshot from step 1, and the other the current version with the data you modified in step 2.

jjg@instance-1:~$ cd /mnt/disks/disk-1/workspace/
jjg@instance-1:/mnt/disks/disk-1/workspace$ echo "This is changed
after the snapshot!" > test.txt
jjg@instance-1:/mnt/disks/disk-1/workspace$ cat test.txt
This is changed after the snapshot!
you can mount it to your machine like any other disk.
create a disk instance from your snapshot
you can mount it to your machine like any other disk.
navigating to the list of disks and choosing Create Disk
choose Snapshot as the source type, then choose disk-1 as your source snapshot.

you can attach that disk to your VM
$ gcloud compute instances attach-disk instance-1
--zone us-central1-a --disk disk-1-from-snapshot
Updated [https://www.googleapis.com/compute/v1/projects/
your-project-id-here/zones/us-central1-a/instances/instance-1].
$ gcloud compute ssh --zone us-central1-a instance-1
# ...
Last login: Mon Sep 5 19:46:06 2016 from 104.132.34.72
jjg@instance-1:~$ sudomkdir -p /mnt/disks/disk-1-from-snapshot
jjg@instance-1:~$ sudo mount -o discard,defaults
/dev/disk/by-id/google-disk-1-from-snapshot
/mnt/disks/disk-1-from-snapshot
Both disks mounted to the same machine, where disk-1-from-snapshot holds the data you had before you modified it, and disk-1 holds the data from afterward.
jjg@instance-1:~$ cat /mnt/disks/disk-1-from-snapshot/
workspace/test.txt
This is a test
jjg@instance-1:~$ cat /mnt/disks/disk-1/workspace/test.txt
This is changed after the snapshot!
Snapshot consistency
If you’re writing to your disk, and you take a snapshot in between two important disk operations?
Fundamentally low-level in that the problem arises because computers tend to cache things in memory instead of always writing the data to your hard drive.
Tell your virtual machine to flush any data that’s stored in memory but not yet on the disk.
To avoid a potentially disastrous snapshot, you should shut down your applications that are writing data
Flush your disk buffers (using the sync command), freeze the disk (using fsfreeze)
jjg@instance-1:~$
jjg@instance-1:~$ sudo sync
jjg@instance-1:~$ sudofsfreeze -f /mnt/disks/disk-1
jjg@instance-1:~$
jjg@instance-1:~$ sudofsfreeze -u /mnt/disks/disk-1
Any attempts to write to the disk will wait until the disk is unfrozen.
Snapshots can protect your data over time
9.2.6. Images
Images are similar to snapshots in that both can be used as the source of content when you create a new disk.
Images are meant as starting templates for your disk,
Snapshots are meant as a form of backup to pinpoint your disk’s content at a particular time.
Create a new VM from a base operating system, you’re using an image under the hood.
An image doesn’t rely on differential storage like snapshots do,
9.2.7. Performance
Create a disk that’s larger than you need for storage if you want to meet performance requirements.
Several classes of persistent disk (Standard, SSD, and Local SSD) are available, each with slightly different performance characteristics
An SSD (solid-state drive) is a type of nonvolatile storage media that stores persistent data on solid-state flash memory. ... Unlike a hard disk drive (HDD), an SSD has no moving parts to break or spin up or down. A traditional HDD consists of a spinning disk with a read/write head on a mechanical arm called an actuator.

Local SSD disks provide the most performance
SSD and Standard disks have two performance profiles,
Standard disks are great if you need lots of space and don’t need super-high performance
SSDs are great for super-fast reads and writes.
9.2.8. Encryption
Storing data in the cloud brings different risks than storing data locally on your home computer
Unauthorized access to your data
Prevent such a scenario, Google encrypts the data stored on your disks,
Copy the bytes directly, they’d be useless without the encryption keys.
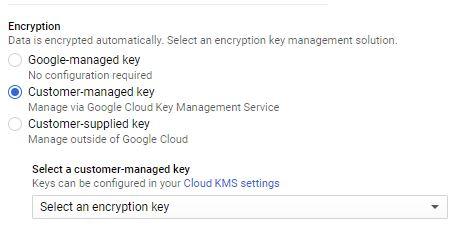
Google comes up with its own random encryption key for your disk and stores that in a secure place with access logged,
You can elect to keep these keys for yourself and give Google the key only when you need to decrypt the disk (such as when you first attach it to a VM).
Creating an encrypted disk where you manage the keys yourself.
You’ll use /dev/urandom in Linux combined with the tr command to put a random chunk of bytes into a file called key.bin.
You can decide either to use RSA encryption to wrap your key or leave the key as is.
Wrapping a key involves encrypting it with a public encryption key so that it can only be decrypted by the corresponding private key.
Ensure your secret is only able to be decrypted by Google Cloud Platform systems.
$ base64 key.bin
ZSqykgCqS0FG+dkpBslgv2lwL9nIgNFKQbN8C09N1vk=
Create a disk like you usually would, but choose Customer Supplied from the Encryption drop-down and leave the box for Wrapped Key unchecked (because you’re leaving the key as plain text)
9.3. Instance groups and dynamic resources
Autoscaling, I mean the ability to expand or contract the number of VMs running to handle requests based on how much traffic is being sent to them,

Experiences a request load that varies over the course of the day
Start of the day, the system sees around 1,000 queries every second, growing quickly until about noon, and it only slows as it approaches 3,000 queries per second.
The perfect world, where your system grows and shrinks to meet your demands, GCE’s setup can use the concept of autoscaling.
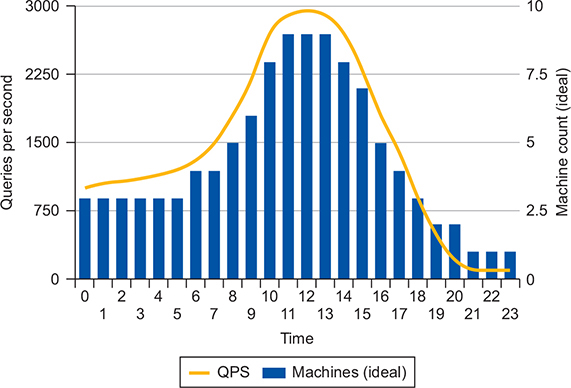
You might not be able to get as close as you’d like to the line, like the one in figure 9.21, but you can get much closer than the block shape shown in figure 9.20, where a specific number of machines is always on regardless of the traffic sent to them
You teach GCE how to turn on instances configured to your liking.
Monitor the overall CPU usage of the currently running instances and decide whether to turn on more,
Two new concepts: instance groups and instance templates.
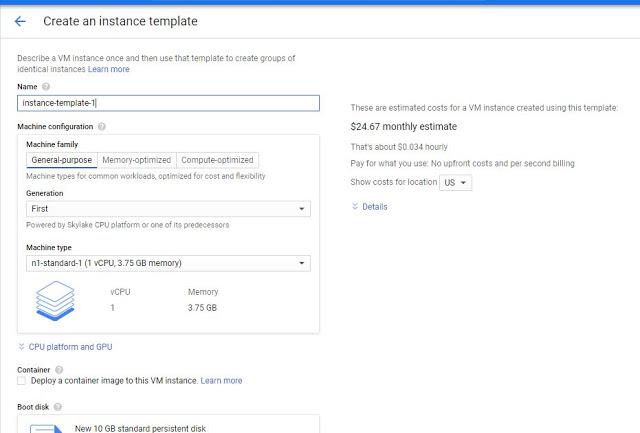
Instance templates are like the recipe for your instances
Contain all of the information needed to turn on a new VM instance
Instance group acts as a container for these managed instances
Given a template and some configuration parameters, is the thing that decides whether to turn on more, turn off some, or leave things alone. choose Instance Templates from the left-hand navigation.

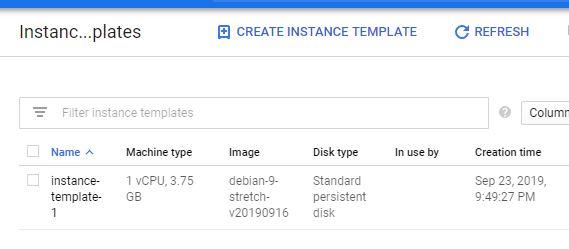
List of templates, and your newly created one will be in the list.
Create Instance Group button at the top.
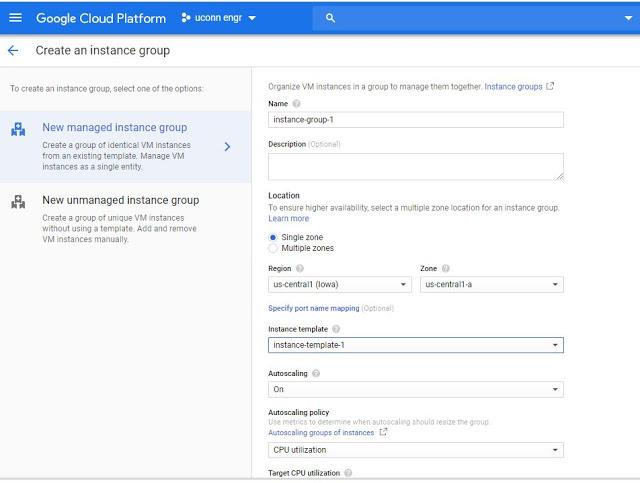
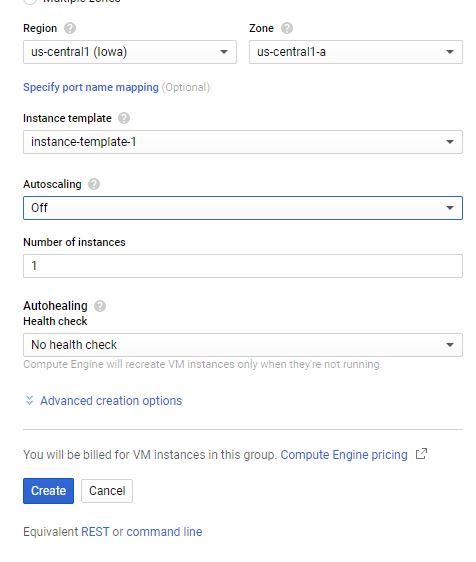
Naming the group itself, and then set the group to be a single-zone group in us-central1-c. Leave the group type as a managed instance grouthe instance template is set to the one you just created.change the number of instances from 1 to 3 Create button at the bottom of the page.
9.3.1. Changing the size of an instance group
You can easily change the size of the group
Growing and shrinking the group straightforward
You can easily shrink your instance group by deleting some of them.
You want to shrink down to a single instance, all you have to do is check the boxes next to two of the three instances
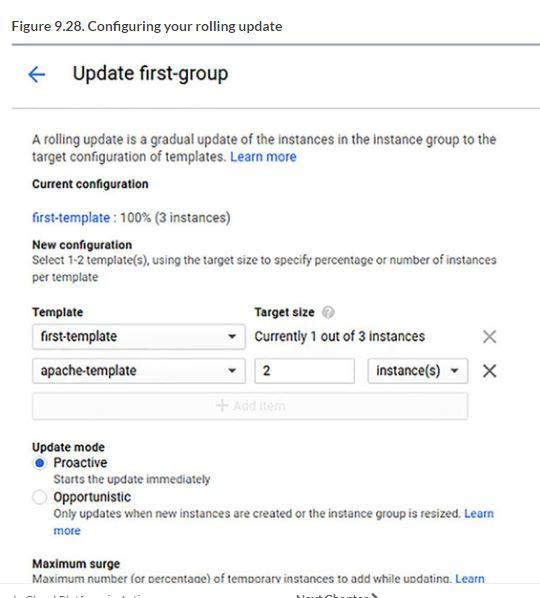
9.3.2. Rolling updates
New software package that you want to deploy across a bunch of machines
Upgrade, say, half of the instances, while leaving the other half alone in case the newest version runs into any problems.
Instance groups can do this using something called rolling updates
Creating a new instance template that turns on a simple Apache web server
1. Choose an Ubuntu 16.04 boot disk (instead of Debian 8).
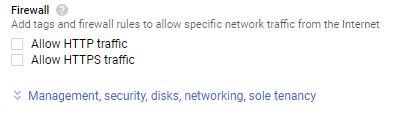
2. Make sure to check the Allow HTTP Traffic box.

Rolling update to phase it into use.
9.3.3. Autoscaling
Looks at various measures of health to decide when to replace an instance or grow and shrink the cluster as a whole.
If a single instance becomes unresponsive, the instance group can mark it as dead and replace it with a new one.
If instances become overloaded (for example, the CPU usage goes above a certain percentage), the instance group can increase the size of the pool to accommodate the unexpected load on the system.
All instances are far under the CPU limit for a set amount of time, the instance group can retire some of the instances to remove unnecessary cost.
The instance group you created and click the Edit button (which looks like a pencil icon).
You’ll notice an Autoscaling drop-down that you previously set to Off

Leave the Autoscale Based On option to CPU Usage
Change the Target CPU Usage to 50%.
Next, make sure the Minimum and Maximum instances are set to 1 and 10
Cool-down period is the minimum amount of time that the group should wait before deciding that an instance is above the threshold.
Spike of CPU usage that lasts less than the cool-down period, it won’t trigger a new machine being created.
Leave this set to at least 60 seconds,
9.4. Ephemeral computing with preemptible VMs
GCE also has another type of machine that’s ephemeral
It might disappear at any moment and never lives for more than 24 hours.
Google gives you a discount on the regular per-hour price in exchange for being able to reclaim the machine at any time and resell it if someone else shows up willing to pay the full price.
9.4.1. Why use preemptible machines?
Most common use for preemptible machines is large-batch workloads, where you have lots of worker machines that process a small piece of an overall job.
Preemptible machines are cheap, and if one of those machines is terminated without notice, the job might complete a bit slower but won’t be canceled altogether.
Split into four chunks. You could use a regular VM to orchestrate the process, and then four preemptible VMs to do the work. By doing this, any one of the chunks could be canceled at any point, but you could retry that chunk of work on another preemptible VM. By doing this, you can use cheaper computing capacity to work on the job. In exchange for your savings, the workers (VMs) may get killed and need replacement

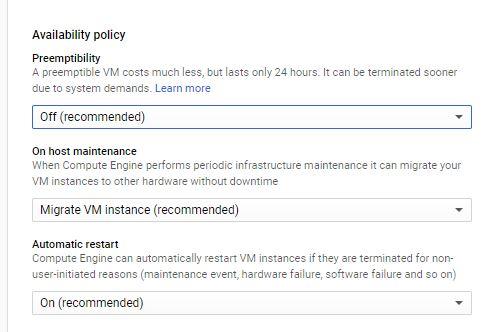
9.4.2. Turning on preemptible VMs
Creating your VM (or your instance template), in the Advanced section
Availability Policy that you can set Preemptibility.
9.4.3. Handling terminations
Preemptible machines can be terminated anytime
understanding how to gracefully handle these terminations is critically important
a reasonable notification window to let you know that it’ll terminate your VM
listen for that notification and finish up any pending work before the VM is gone.
Setting a shutdown script—sort of the opposite of what you did with your instance templates’ startup scripts.
GCE gives the VM 30 seconds to finish up, and then sends a firm termination signal
Gives your shutdown script 30 seconds to do its work. After 30 seconds, the plug gets pulled.

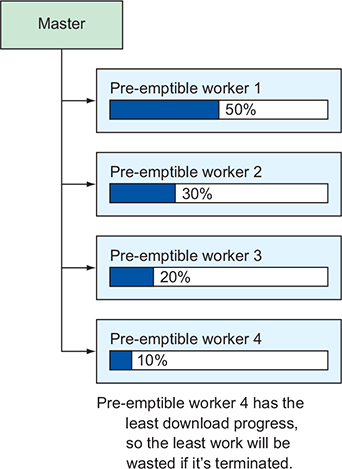
9.4.4. Preemption selection
Selecting a VM to terminate, GCE chooses the youngest one
Each VM needs to download a large (5 GB) file.
The first VM will have more download progress than the second, third, and fourth
Which VM causes the least amount of wasted work if it has to be terminated and start over? Obviously, it’s the one that started last
9.5. Load balancing
Sometimes the overall traffic that you need to handle across your entire system is far too much for a single machine.
Instead of making your machines bigger and bigger to handle the traffic, you use more machines and rely on a load balancer to split (balance) the traffic (load) across the available resources

Google Cloud Platform offers a fully managed load balancer that does all of the things that traditional software load balancers can do.
Take incoming requests at the front and spread them across some set of machines at the back
Load balancer will have both frontend and backend configurations
Single VM handling calculations is overwhelmed by traffic.
You’d create a second VM running the exact same software as the first
Create a load balancer to spread the traffic evenly across the two machines

Load balancer frontend would listen for HTTP traffic and forward all requests to the backend
Once the calculating is done, the VMs respond with the result, and the load balancer forwards the response back over the connection used to make the request.
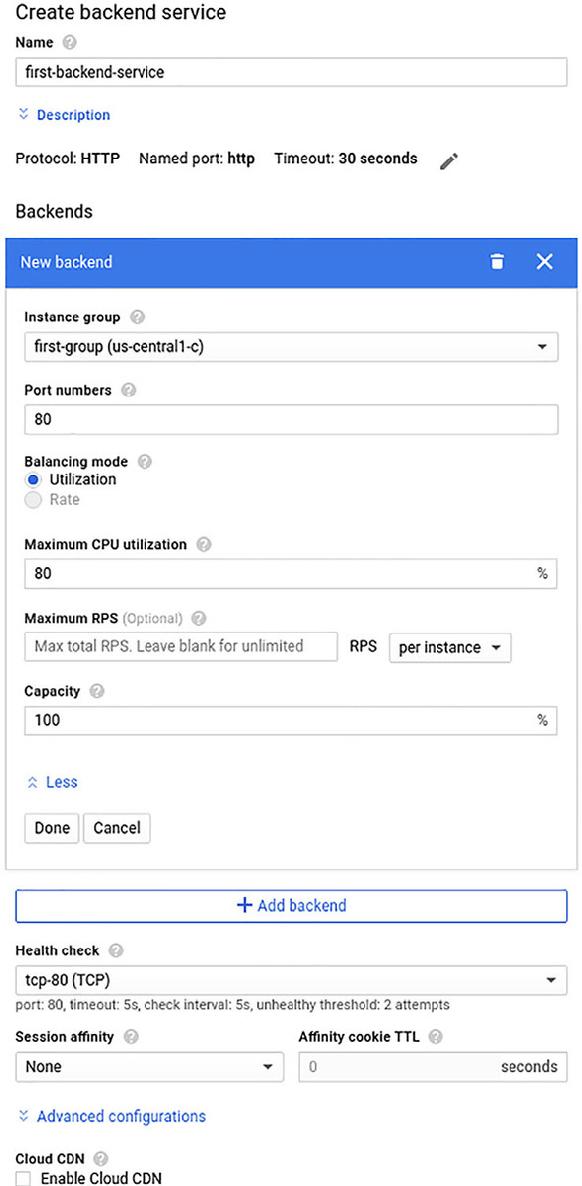
9.5.1. Backend configuration
Create what’s called a backend service.
Collection of backends (typical VMs running in GCE) that currently refer only to instance groups.
Create or Select Backend Services; Backend Buckets.
Instance group, you used things like target CPU usage to tell GCE when it should turn on more instances
Load balancer, these things describe when the system should consider the backend to be over capacity
Backend as a whole goes over these limits, the load balancer will consider it to be unhealthy and stop sending requests .
Creating a health check
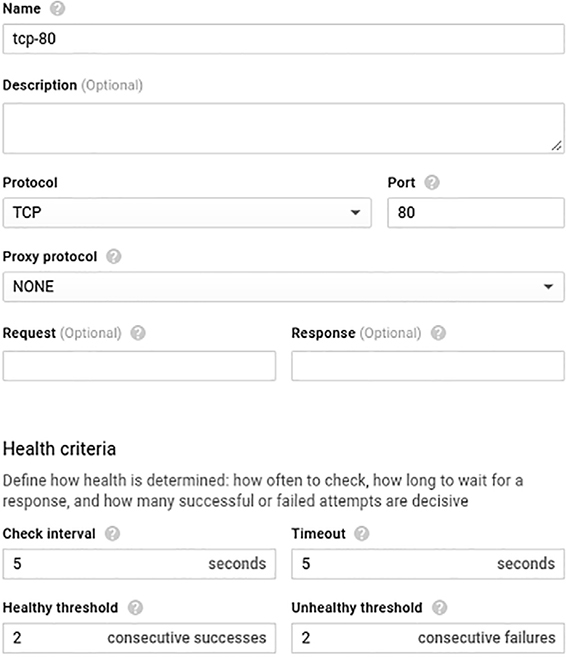
Health checks are similar to the measurements that are taken to decide whether you need more VMs in an instance group
Less about the metrics of the virtual machine (such as CPU usage) and instead focus on asking the application itself if everything is OK.
Simple static response page to show that the web server is up and running
Simple TCP check to see that port 80 is indeed open
9.5.2. Host and path rules
Multiple different backends and using them all together.
Specific backend had to handle the more complicated requests
Create a separate backend for them, route the relevant requests to that backend
9.5.3. Frontend configuration
handle normal HTTP traffic
the IP address for your load balancer may change from time to time.
when it says the IP address is Ephemeral
mycalculator.com, you’d create a new static IP address

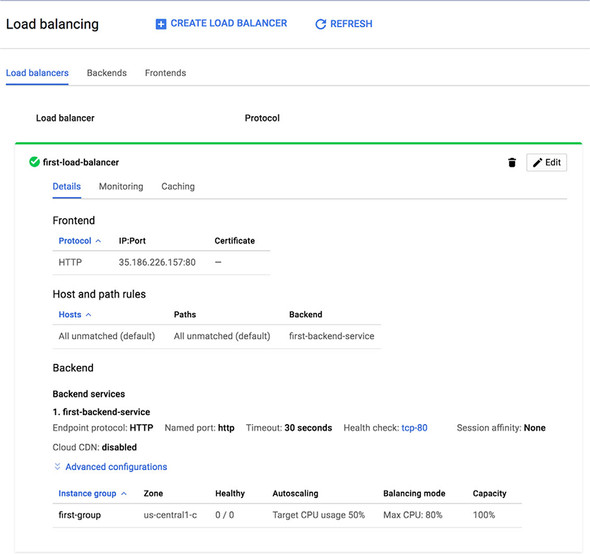
9.5.4. Reviewing the configuration
Instance group called first-group
Health check called tcp-80,

Create (not shown) will start the process of creating the load balancer and the health checks, assigning an ephemeral IP, and getting ready for your load balancer to start receiving requests
9.6. Cloud CDN
Identical requests will go to the servers running the application.
Sometimes identical requests also yield identical responses.
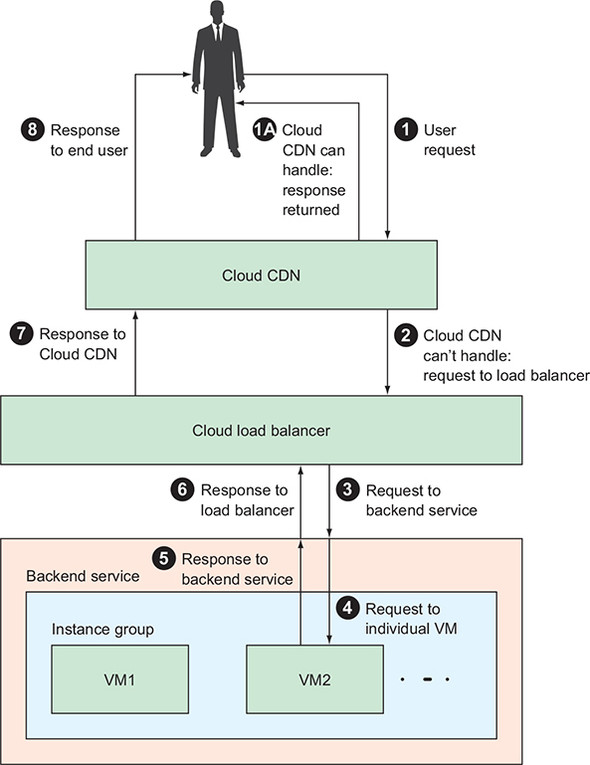
Avoid duplicating effort, it turns out that Google Cloud Platform has something called Google Cloud CDN that can automatically cache responses from backend services and is designed to work with GCE and the load balancer that you just created.
Sits between the load balancer and the various people making requests
A request starts from a user (1),
If Cloud CDN can handle the request, it returns a response immediately (1A).
Load balancer, backend service, instance group, and VM instances never even see the request.
The request follows the traditional path of visiting the load balancer (2), then the backend service (3), which routes the request to an individual VM(4).
Response flows back over the same path to the load balancer (5, 6).
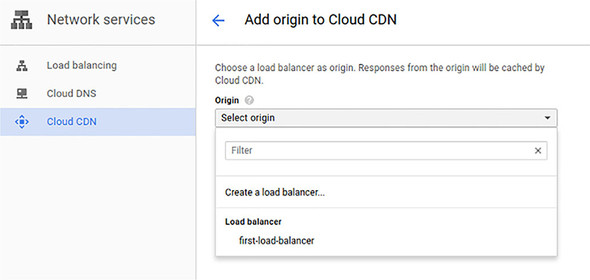
9.6.1. Enabling Cloud CDN
In the left-side navigation of the Cloud Console, choose Cloud CDN from the Network Services section. Once there, you’ll see a form prompting you to add a new origin for Cloud CDN, and you’ll click Add Origin.
9.7. Understanding pricing
The basic features of GCE have straightforward prices, whereas some of the more advanced features can get complicated, and even more complicated when you consider an important discount available for sustained use. I’ll start by talking about the simple parts, then move into the more complicated aspects of GCE pricing.
You need to consider three factors for pricing with GCE:
1. Computing capacity using CPUs and memory
2. Storage using persistent disks
3. Network traffic leaving Google Cloud
9.7.1. Computing capacity
The most common way of using GCE is with a predefined instance type, such as n1-standard-1
Table 9.2. Cost and details for some common instance types
9.7.2. Sustained use discounts
9.7.2. Sustained use discounts

discount for buying in bulk
9.7.3. Preemptible prices
Preemptible VMs have special price reductions in exchange for the restrictions on these instances.
Prices vary from location to location
Around 80% cheaper than the standard hourly prices. If you’re cost-conscious, it might make sense to see if you can find a way to make preemptible instances work for your project.
9.7.4. Storage
Each of these classes has a different cost (with SSD disks costing more than standard storage)
Table 9.5. Data storage rates based on location and disk type
9.7.5. Network traffic
Most VMs you create will be sending data back to customers
Look at both where the traffic comes from and where it’s going.
Networking prices for traffic to Australia or mainland China are the same regardless of the source, but that could change down the line. For all other locations (everywhere except those two), the cost varies depending on where the VM is sending the data from.
Table 9.6. Network prices per GB of data for most locations
8. When should I use GCE?
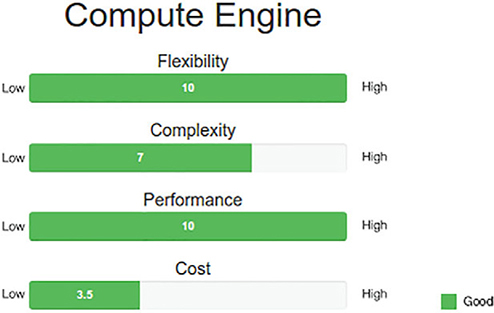
9.8.1. Flexibility
GCE is that it’s as flexible as you can get in a cloud computing environment.
You found that you needed some special load balancing feature, you could opt to not use a hosted load balancer and instead turn on your own VM to run the load balancing software
9.8.2. Complexity
GCE is far from simple.
More powerful features of GCE, things can get much more difficult quickly.
Autoscaling capability, you first have to understand how instance templates work
9.8.3. Performance
GCE scores particularly well
Being as close to bare metal as you’ll get in Google Cloud means that you have the fewest possible abstraction layers between your code and the physical CPU doing the work
9.8.4. Cost
GCE is relatively low on the cost scale, given that you’re only paying for raw virtual machines and disks.
Additionally, computing resources are discounted as you use them throughout the month
Summary
Virtual machines are virtualized computing resources, a bit like slices of a physical computer somewhere.
GCE offers virtual machines for rent priced by the hour (billable by the second) as well as persistent replicated disks to store data for the machines.
GCE can automatically turn machines on and off based on a template, allowing you to automatically scale your system up and down.
With highly scalable workloads where worker VMs can turn on and off quickly and easily, preemptible VMs can reduce costs significantly, with the caveat that machines can live no longer than 24 hours and may die at any time.
GCE is best if you want fine-grained control of your computing resources and want to be as close to the physical infrastructure as possible.
No comments:
Post a Comment